Scroll to the bottom for TL;DR.
How do you publish your Android apps to the Google Play Store? Do you have a written step by step release procedure? Are you tired of performing the same steps manually again and again? If you are looking to reduce the friction of the publishing process for your Android apps, this article is for you.
Publishing each new version of your Android application to the Google Play store is a repetitive process which contain many steps. Performing it manually takes time and introduces possibility for errors. Moreover, in an era where AI coding tools are improving every day, it becomes increasingly easy to setup the automation processes that save us a lot of time in the future and improves our development experience. If you already happen to have a written procedure which documents the exact steps you take when publishing each of your apps, you are already half way there.
This article is a step by step practical guide on how to create an automatic process to publish your Android apps to the Google Play Store. It also contains a markdown file with detailed explanation for your coding agent which instructs it how to implement the automation for your app.
Release Procedure
Once you’ve finished building and testing the next feature in your application, the next step is to make the new feature available for your users by publishing your app on Google Play Store. As we have all experienced, after repeating this process manually a couple of times, we recognize that the process usually involves a collection of chronological repeatable steps.
Personally I like to have a dedicated markdown file in the /docs folder of each repository which contains a checklist of the specific steps required to release a particular app. Once this file exists, making a new release becomes a matter of following the checklist and performing the steps one by one. If you also maintain a checklist of steps required for a next release, it can be used for your coding agent and automation tool to make reliable releases of your app on your behalf. In the next sections of this article, we will see how.
To release a new version of an Android app requires us to perform some steps on our development machine and also in Google Play Console.
Below is a typical sequence of general steps required for a new release:
Steps we perform on your local development machine:
- Update
versionCodeinbuild.gradle - Update
versionNameinbuild.gradle - Adjust and set proper values for build variants and source sets
- Build and test the app
- Locate the APK or the AAB file in the release folder
Steps you perform in Google Play Store:
- Update previous release rollout percentage
- Create a new release
- Upload APK or AAB to Play Store
- Update rollout to desired value
- Fill in release notes
It is true that some of the above steps require our judgement and input, but others can be completely automated away by a coding agent and an automation tool, and that is what we are going to do next.
Publishing Automation Tools
When searching for Google Play Store publishing automation tools, a few options usually pop up. The most common ones for Android are GPP, Fastlane, Upload Play GitHub Action.
Under the hood, all three of the listed above, use the official Google Play Developer APIs. The Google Play Developer APIs allow developers and automation tools to perform programmatic operations in the Google Play Console. Those are native APIs exposed by Google Play and allow custom workflows to be implemented.
To make use of those native APIs, we will enable them and setup up a service account which will authenticate an automation tool to invoke the APIs.
Gradle Play Publisher
https://github.com/triple-t/gradle-play-publisher
As per GPP site: “Gradle Play Publisher (GPP) is Android’s unofficial release automation Gradle Plugin. It can do anything from building, uploading, and then promoting your App Bundle or APK to publishing app listings and other metadata.”
This is an unofficial open source Gradle plugin which is intended to automate the process of publishing Android applications directly to the Google Play Store. The tool was created on 2014, and has been in development since.
This tool is not officially supported by Google, it is an open source community project maintained by Triple T and the community contributors. The tool wraps the official Google Play developer APIs and allows developers to bypass manual publishing of apps to the Play Store.
GPP has native Gradle integration which means that it does not require additional dependencies as part of the project. GPP allows you to manage all aspects of app publishing such as uploading the APK or AAB, track promotion, listing management operation such as app descriptions, release notes, promotional graphics and more.
Upload Play GitHub Action
https://github.com/r0adkll/upload-google-play
This is a popular third party open source GitHub Action which is used to upload Android application packages directly to the Google Play Store. The tool was created in 2020 and since then matured into a complete CI/CD automation tool.
This tool is also not officially supported by Google. It is an open source utility created and maintained by r0adkll with the help of community contributions. Under the hood Upload Play GitHub Action wraps the official Google Play Developer API.
The primary use for this tool is setting up an automation process which runs as a GitHub action. It allows publishing compiled APK or AAB files directly to the Google Play Store. It supports track management and staged releases.
This GitHub action is able to upload the release notes, however as of the time of writing this post (07.2026), it is not able to update the store listing, and for this you need to use additional GitHub Actions as part of your automation pipeline.
Fastlane Supply
https://github.com/fastlane/fastlane
Fastlane is another open source command line tool which can be used to automate the process of delivering Android Apps to the Google Play Store. Fastlane ecosystem was launched in 2015, and is maintained by a global community of open source contributors.
Fastlane is currently not officially supported by Google, although there was a time when Fastlane was receiving financial sponsorship from Google. Just like other tools mentioned in this article, Fastlane also wraps the official Google Play API in order to perform its functionality.
Fastlane can manage the store listing attributes like title, descriptions, release notes, screenshots, promotional graphics and more. You can also manage release tracks, which essentially means that you can automate the whole process of building and releasing your application.
You can invoke Fastlane locally from your machine and also from GitHub Actions, which allows you the most flexibility to your needs.
The rest of this article is going to focus on implementing Fastlane in your Android project and performing additional configurations required for making it work. Personally I like deploying to Google Play Store from my local machine, and due to this this post does not cover setting up Fastlane in your CI/CD pipeline.
Setting up Fastlane Supply
There are three major stages which are required to automate new app deployment with Fastlane. Stages 1 and 2 are performed once per app during automation setup, completely or partially. Then, you repeat the steps in Stage 3 each time you want to make a new release.
Overview of the major stages and steps of the process:
- Human Setup: Setup Service Account
- Create Google Cloud Project
- Enable Google Play Developer API
- Create Service Account
- Grant Permissions in Google Play Console
- Agent Setup: Integrate Fastlane in Project
- Install Ruby
- Install Fastlane
- Init Fastlane
- Create Automation File (Fastfile)
- Deploy with Fastlane
- Prepare Release
- Update release notes
- Update Store Listings (optional)
- Execute Fastlane
Stage 1 is the only one which has to be performed completely manually and and is the most complex one. Then, we can use a coding agent like claude-code to help us perform stage 2 and then stage 3 each time we want to release a new app to Google Play Store.
At the bottom of the tutorial you will find fastlane-supply.md which you can place in your project and then ask your coding agent to implement the release automation.
1. Setup Service Account
The purpose of this stage is to create a service account and to provide it with appropriate permissions Service account is like user account but one which you create for automation tools to perform actions on your behalf. It is an account you create, assign specific permissions to and then provide to the automation tool.
1.1. Create Google Cloud Project
To create a service account, first we need to create a Google Cloud project which will host the account.
If you already have a Google Cloud project, you can create the service account there.
Still it might be a good idea to create separation, and to create a dedicated Google Cloud project for Play Console.
To create a new project:
- Go to the Google Cloud Project Creation Console
- Set the project name: (e.g.,
google-play-console) - Set the Parent Organization (select "No Organization" if not using an enterprise account)
- Click the Create button
1.2. Enable Google Play Developer API
Enable Google Play Developer API in the newly created Google Cloud project.
- Go to the Google Play Developer API Manager
- Select the
google-play-consoleproject created in the previous step - Click "Enable" on the Google Play Developer API
1.3. Create Service Account
In the google-play-console project, create the new service account.
This service account is used to allow Fastlane to interact with Google Play Developer API.
- Open the navigation menu on the left side
- Go to: API and Services > Credentials > + Create Credentials (on the top bar) > Service Account
- Service Account Name:
fastlane-supply - Service Account ID:
fastlane-supply - Service Account Description:
Service Account for Fastlane supply to access Google Play Console - Click "Create and continue"
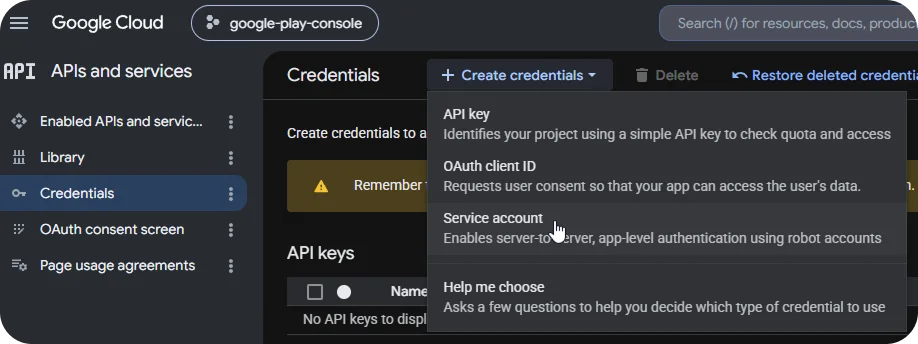 Create a new service account in Google Cloud Project
Next, we will create a new key for the service account and download it to our machine.
- Click the created service account in the list of service accounts
- Go to: Keys > Add Key > Create New Key > JSON
- Download the JSON file on a known location on your PC (this file is not to be committed to git)
- Write down the email of the service account (for example:
[email protected])
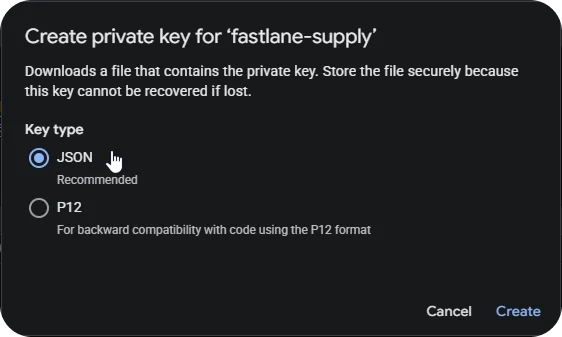 Create new private key for the service account and download it to your machine
You can place the service account JSON in C:/fastlane/fastlane-supply-service-account.json or any other known location.
The path to the service account JSON file will be used in later steps.
1.4. Grant Permission in Google Play Console
The purpose of this step is to allow the Fastlane Service account to interact with Google Play Console.
- Log in to the Google Play Console
- In Google Play Console go to "Users and Permissions" on the left navigation panel
- Click "Invite New Users" (or manage the already existing service account user)
- Paste the Service Account Email from previous step as the email of the new user
- Add permissions to manage apps: View App Information (Read only), and all the permissions in the Releases and Store Presence
2. Integrate Fastlane into Project
2.1. Install Ruby (Windows)
Download Ruby+Devkit from Ruby Installer (latest 3.x) and install.
Open bash and verify installation:
# Verify Ruby installation (requires Ruby 3.x or higher)
ruby --version

# Install Bundler to manage project dependencies
gem install bundler
2.2. Install Fastlane
In your project root create ./Gemfile with below contents:
source "https://rubygems.org"
gem "fastlane"
Run below command to install dependencies as defined in ./Gemfile.
# install dependencies as defined in ./Gemfile
bundle install
# run periodically to update versions
bundle update
2.3. Init Fastlane
Use below command to validate that fastlane is able to use the service account and communicate with Google Play Developer API:
fastlane run validate_play_store_json_key json_key:"C:/fastlane/fastlane-supply-service-account.json"In your project, create /fastlane/Appfile with below contents:
# update to actual location of the service account
json_key_file("C:/fastlane/fastlane-supply-service-account.json")
# update to actual package name for app com.example.package
package_name("<PACKAGE_NAME>")
Run Fastlane init to download existing project metadata.
This can be executed only after the fastlane/Appfile is in place:
# download existing play store metadata
bundle exec fastlane supply init
This populates ./fastlane/metadata/ folder with the current Play Store content.
project-repository/
├── Gemfile
├── Gemfile.lock
└── fastlane/
    ├── Appfile
    ├── Fastfile (created in the next step)
    └── metadata/
        └── android/
            └── en-US/
                ├── title.txt
                ├── short_description.txt
                ├── full_description.txt
                ├── video.txt
                ├── changelogs/
                │   └── {versionCode}.txt
                └── images/
                    ├── featureGraphic.png
                    ├── icon.png
                    └── phoneScreenshots/
Commit the newly created folder structure and metadata to git.
CommitGemfile.lockto version control for reproducible builds.
2.4. Create Fastfile Automation File
Fastfile contains your "lanes" which are sets of instructions to automate.
You can create as many lanes as you want and they can use one another to implement complex workflows.
Below Fastfile contains lanes to automate beta testing and production uploads.
In your project, create ./fastlane/Fastfile with below contents:
default_platform(:android)

platform :android do

  desc "Build release AAB"
  lane :build do
    gradle(
      task:       "bundle",
      build_type: "Release"
    )
  end

  desc "Complete the current staged rollout on the production track to 100%"
  lane :complete_rollout do
    version_codes = google_play_track_version_codes(track: "production")
    if version_codes.empty?
      UI.important("No releases on the production track - nothing to complete.")
      next
    end

    version_code = version_codes.max # in-progress staged release is the newest (highest) code
    UI.message("Completing rollout for version code: #{version_code}")

    begin
      upload_to_play_store(
        track:                   "production",
        version_code:            version_code,
        rollout:                 "1",
        skip_upload_apk:         true,
        skip_upload_aab:         true,
        skip_upload_metadata:    true,
        skip_upload_changelogs:  true,
        skip_upload_images:      true,
        skip_upload_screenshots: true
      )
    rescue => e
      UI.important("Could not complete rollout (likely already at 100% / no staged rollout in progress): #{e.message}")
    end
  end

  desc "Upload the built release AAB to Production - 30% staged rollout"
  lane :upload_production do
    upload_to_play_store(
      track:                   "production",
      release_status:          "inProgress",
      rollout:                 "0.3",
      aab:                     lane_context[SharedValues::GRADLE_AAB_OUTPUT_PATH],
      skip_upload_apk:         true,  # because we upload aab and not apk
      skip_upload_metadata:    false,
      skip_upload_changelogs:  false,
      skip_upload_images:      true,  # set to false if you want to upload images
      skip_upload_screenshots: true   # set to false if you want to upload screenshots
    )
  end

  desc "Upload the built release AAB to Open Testing"
  lane :upload_open_testing do
    upload_to_play_store(
      track:                   "beta",
      aab:                     lane_context[SharedValues::GRADLE_AAB_OUTPUT_PATH],
      skip_upload_apk:         true,  # because we upload aab and not apk
      skip_upload_metadata:    false,
      skip_upload_changelogs:  false,
      skip_upload_images:      true,  # set to false if you want to upload images
      skip_upload_screenshots: true   # set to false if you want to upload screenshots
    )
  end

  desc "Complete previous rollout, build release AAB, and upload to Production at 30% rollout"
  lane :deploy_production do
    build
    complete_rollout
    upload_production
  end

  desc "Build release AAB and upload to Open Testing"
  lane :deploy_open_testing do
    build
    upload_open_testing
  end

end
Adjust the above Fastfile according to your needs.
3. Deploy with Fastlane
Perform steps in this stage each time you want to upload a new version of your app to the Play Store.
3.1. Prepare Release
Finish making any code changes and preparations for your next release.
- Update
versionCodeinapp/build.gradle(orapp/build.gradle.kts) - Update
versionNameinapp/build.gradle(orapp/build.gradle.kts) - Ensure logging and environment variables are set to production levels (e.g., root
level="info"in logging configs)
Here you can document any specific instructions for preparing new releases for your app. From which branch to release, how to tag the release in git etc.
3.2. Update Release Notes
Create a new changelog text file named after the new versionCode in changelogs/ folder.
Fastlane uses the contents of this file to populate the release notes section.
/fastlane/metadata/android/<LOCALE>/changelogs/<VERSION_CODE>.txtExample of change log file for versionCode 64:
File: /fastlane/metadata/android/en-US/changelogs/64.txt
- Added dark mode support
- Fixed navigation routing crash
- Performance improvements
3.3. Update Store Listing
Update any desired store listing metadata in the fastlane/metadata/ folder.
Make sure app metadata reflects the new version of the application.
Also make sure that in your Fastfile you do not skip the desired upload steps.
3.4. Execute Fastlane
Invoke the desired lane:
# Deploy to Production (30% staged rollout)
bundle exec fastlane deploy_production

# Deploy to Open Testing (Beta track)
bundle exec fastlane deploy_open_testing
TL;DR: Frictionless Setup with Claude Code
- Manually complete an initial release of your app to Google Play Store
- Manually perform Stage 1 in this tutorial
- Download fastlane-supply.md and place it inside
/docsfolder of your app repository - Update section 3.1 in
fastlane-supply.mdto reflect your release procedure
Use below prompt in claude-code to instruct claude code to perform setup stage 2:
Read @docs/fastlane-supply.md
This file contains instruction to setup fastlane automation in current project.
The service account json file is located in c:/fastlane/fastlane-supply-service-account.json
Your task is to perform stage 2 Integrate Fastlane in Project based on the instructions in fastlane-supply.md
Perform the tasks, validate play store json, and run fastlane init.
Provide a detailed report of the actions performed.
Use below prompt to prepare and validate your next incremental release:
Read @docs/fastlane-supply.md
Validate that everything is ready for making a new release as described in stage 3. Deploy with Fastlane.
Do not make any changes, create a detailed readiness report.
Go over the report and make any necessary changes and preparations.
Once you are ready, use below prompt to make a new release:
Deploy to production with fastlane based on @docs/fastlane-supply.mdIt is possible to convert fastlane-supply.md to a rule or a skill, but it works just fine by just manually pointing your coding agent to the instructions file whenever needed.
References
- Fastlane Supply setup for coding agents
- https://github.com/triple-t/gradle-play-publisher
- https://developers.google.com/android-publisher
- https://console.cloud.google.com/apis/library/androidpublisher.googleapis.com
- https://github.com/fastlane/fastlane
- https://stackoverflow.com/questions/23427304/automatic-publish-beta-android-app-to-the-google-play-store
- https://connortumbleson.com/2025/12/01/a-history-of-fastlane/
You can also read this story on Medium Automating Play Store Uploads with Fastlane Supply and Coding Agents